Getting Started
DEPRECATED
This guide is for the deprecated Flex.API. Please don't use it for new implementations.
See Integration Options, and feel welcome to ask our friendly help desk.
Introduction to Flex.API
The Flex.API uses HTTPS to create payment transactions or to perform other actions. (Unencrypted HTTP is not offered for security reasons. But we will use the term HTTP when we refer to request methods, headers, and the like.) The data is represented in JSON.
Basic Workflows
There are two possible workflows:
sale: The money is captured immediately. (Invoice payment needs an additional call to capture.)
authorization: The payment is only authorised. It needs a subsequent interface call to actually capture the money.
Every payment transaction is predetermined to a particular payment method.
Working Example
In our brief example we will create a payment transaction direct debit, using the sale flow. Then we will start the payment iframe. We will use JSON as data transfer format.
These are the steps we will:
Obtain the available payment methods. This is not necessary, but recommended, and easy to achieve.
Create the payment transaction, and direct the customer to the Payment Wizard.
Obtain the status of the transaction when the customer is returned. This is not necessary, but recommended, and easy to achieve.
Step 1: Obtain the Available Payment Methods
First we send a GET request to /payment/gettypes to obtain the available payment methods. This is our HTTP request, directed to our test system:
GET /payment/gettypes HTTP/1.1Host: api-testing.secupay-ag.deContent-Type: application/json; charset=utf-8;Accept: application/jsonAccept-Charset: utf-8{ "data": { "apikey":"6801fxxxxxxxxxxxxxxxxxxxxxxxxxxxxxxx7ace" }}The needed API key can be requested from our customer service.
This would be our response:
HTTP/1.1 200 OKContent-Type: application/json; charset=utf-8;...{ "status": "ok", "data": [ "prepay", "debit", "invoice", "creditcard", "sofort" ], "errors": null}The returned payment methods correspond one-to-one with the field payment_type of the next step. As you see, a lot of different payment methods are active here.
Step 2: Create a Payment Transaction
Knowing direct debit would work, we offer it to our customer. Since our example uses the sale flow it must be offered at the end of your checkout process. The customer will close the contract with you together with the payment.
Here is our example request:
POST /payment/init HTTP/1.1Host: api-testing.secupay-ag.deContent-Type: application/json; charset=utf-8;Accept: application/json;Accept-Charset: utf-8{ "data":{ "apikey": "6801fxxxxxxxxxxxxxxxxxxxxxxxxxxxxxxx7ace", "demo": 1, "payment_type": "debit", "currency": "EUR", "amount": "1995", "purpose": "Test Order", "url_success": "https://example.org/SUCCESS", "url_failure": "https://example.org/FAILURE", "url_push": "https://example.org/PUSH", "language": "de_DE", "title": "Herr", "firstname": "Max", "lastname": "Mustermann", "street": "Musterstr.", "housenumber": "112 a", "zip": "09555", "city": "Musterhausen", "country": "DE", "telephone": "+495555555555", "dob_value": "01.02.1903", "email": "max@example.org" }}As you see, the request is an HTTP POST to https://api-testing.secupay-ag.de/payment/init. The payment is about €19,95.
Monetary amounts are expressed in the smallest currency unit (e. g. Euro Cent).
You see also a demo flag. Although it has no extra effect on the testing server, it is good to know it. You can use it in the productive environment to create payment transactions that are not being captured.
This is the response of the server:
HTTP/1.1 200 OKContent-Type: application/json; charset=utf-8;...{ "status": "ok", "data": { "hash": "tujevzgobryk3303", "iframe_url": "https://api-testing.secupay-ag.de/payment/tujevzgobryk3303" }, "errors": null}Everything worked. The payment transaction is created.
To successfully carry out a demo transaction, your contract requires the appropriate conditions. Should the request be rejected with the error code 0007, please contact customer service for activation.
Please notice the two fields hash and iframe_url. The URL is given to the buyer in order to authorise the payment, and finally confirm the business transaction at the same time. If former API requests need to be performed, you should store the hash on your server. If the payment method was prepaid or invoice there would also be additional data that is explained in the Reference section.
This is what your customers see, if they open the iframe_url in their browser:
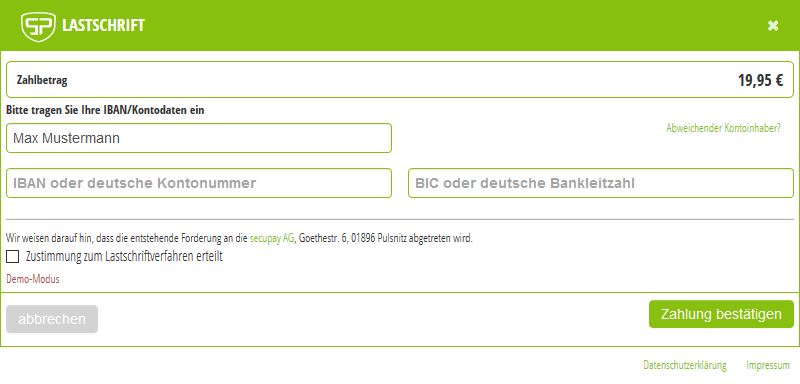
The customer is prompted to confirm the payment, and sometimes for the needed data. When they use the buttons to submit or cancel, they are either directed to the success URL or the failure URL. In some cases the customer is not directed back to one of these URLs. They might simply stop here, and close the browser.
Despite its name, you should not open the iframe_url within an Iframe ( <iframe> ):
It is forbidden to conduct a Sofort payment within an Iframe. (s. link to Sofort Integration Center)
3-D Secure checks can leave the Iframe and switch to full-screen. In this case, the success (url_success) or failure URL (url_failure) of the shop is not opened inside the Iframe, but in the uppermost browser window (DOM window.top).
Some popular browsers have very strict same-origin restrictions for third party content, so that Cookie technology will not work inside Iframes. Most external authorisation flows cannot be completed.
Step 3: Obtain the Transaction Status
We recommend that you also check the status of the transaction after the success URL was called.
This is an example request to obtain the status from our server:
POST /payment/status HTTP/1.1Host: api-testing.secupay-ag.deContent-Type: application/json; charset=utf-8;Accept: application/jsonAccept-Charset: utf-8{ "data":{ "apikey": "6801fxxxxxxxxxxxxxxxxxxxxxxxxxxxxxxx7ace", "hash": "tujevzgobryk3303" }}Example response:
HTTP/1.1 200 OKContent-Type: application/json; charset=utf-8;...{ "status": "ok", "data": { "hash": "tujevzgobryk3303", "status": "accepted", "created": "2018-07-01 12:54:56", "demo": 1, "trans_id": "23265478", "amount": "1995", "currency": "EUR", "opt": { "masked_payment_data": { "purpose": "TA 23265478", "data": "DE27 XXXX XXXX 9700" } } }, "errors": null}If the payment method was prepaid or invoice additional details would be available.
Summary
We have obtained the available payment methods with a first interface call. After this we created a payment transaction for direct debit payment to be captured immediately. We found the iframe URL in it, and acted as customer in our tests. We have entered the bank details, and confirmed the payment. Afterwards, we were led back to the shop's success URL. We have also found the transaction's hash and used it for a second API call to obtain the transaction status.
Furthermore you can:
use the authorization flow;
use other payment methods (credit card, advance payment, invoice payment, Sofort);
define return URLs to direct the customer back to your website;
show a detailed basket;
show project or payment details;
define stakeholder shares;
defer the capture for a condition (accrual);
work with recurring payments for subscriptions;
customize the button text or the primary design colour;
use informal speech, or change the language.
Everything you need as a merchant is found in the following reference section. Furthermore you will find details of the communication protocol, the test environment and the demo flag.