Pay with Credit Card
Prerequisites
As a prerequisite, you should understand:
Credit Card Iframe Integration
To integrate credit card payment into your custom checkout you need to use our credit card iframe ( https://cc.secupay.com/ ). Your page needs a button to establish the communication to our iframe, to make the user submit the form, and to respond on iframe height changes or returned data. When the data is valid, you will use it to create a Payment Container in a later step.
This is an example implementation, that helps you to understand this:
<!DOCTYPE html><html><head> <title>CC Iframe Example</title> <meta charset="utf-8"/> <meta name="viewport" content="width=device-width, initial-scale=1.0"/> <style>body { font-family: sans-serif;} </style></head><body> <h1>CC Iframe Example</h1> <div style="max-width: 700px"> <iframe id="iframe" src="https://cc.secupay.com" width="100%" height="400px" style="border: 1px dashed lightblue;"></iframe> </div> <form> <button id="submit-button" type="button">Confirm</button> </form> <script>const IFRAME_ORIGIN = 'https://cc.secupay.com';const iframeElement = document.getElementById('iframe');const iframeContentWindow = iframeElement.contentWindow;/** * Set iframe parameters */window.addEventListener('load', function (e) { console.info('init CC iframe'); // Set owner (optional) iframeContentWindow.postMessage( { action: "set-owner", owner: "Max Mustermann" }, IFRAME_ORIGIN ); // Set theme iframeContentWindow.postMessage( { action: "set-theme", theme: 1, // 0 = secupay, 1 = custom }, IFRAME_ORIGIN ); // Set language (optional) iframeContentWindow.postMessage( { action: "set-lang", lang: "en" }, IFRAME_ORIGIN );}, false);/** * Respond on iframe messages */window.addEventListener('message', function (e) { // Check origin if (e.origin !== IFRAME_ORIGIN) { console.warn('bad origin ' + e.origin); return; } switch(e.data.action) { // Iframe height changed. This is raised on load, and after validation. case 'cc-iframe-height': console.info('new iframe height ' + e.data.documentHeight); iframeElement.height = e.data.documentHeight + 'px'; break; // Iframe sends data. These may be valid or not. case 'prepared-cc-data': console.info('credit card data', e.data.data); break; default: console.warn('unknown message ' + e.data.action, e.data); break; }}, false);/** * Handle submit button */document.getElementById('submit-button').addEventListener('click', function () { console.info('clicked button'); // Make CC iframe validate the form, and send back the data iframeContentWindow.postMessage({ action: "get-cc-data" }, IFRAME_ORIGIN);}); </script></body></html>(Download: test_cc_iframe.html)
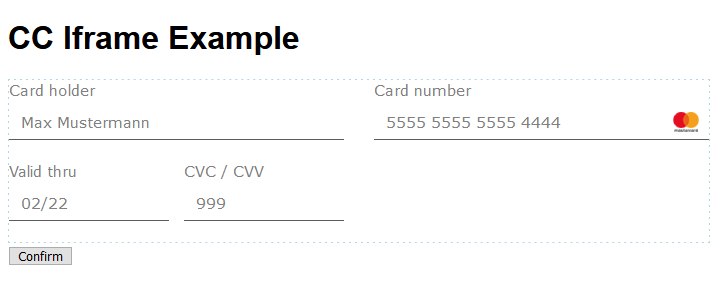
This is what it looks like in your browser:
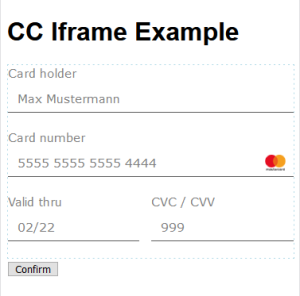
On a small mobile device:
The thin dashed border around the iframe is only used to visualise the iframe border, and the change of dimensions while you play with it.
In line 23-25 of our HTML we have defined a symbolic constant for the iframe origin, and two fix objects to access the iframe and its content window more conveniently. The iframe origin needs to be passed to authorise the cross-origin communication, or to validate the message origin.
You can display the form in a compact view and omit the card holder field by adding some URL parameters to the iframe URL:
|
Iframe URL |
Display |
|
traditional view |
|
|
https://cc.secupay.com?view=compact&owner=true |
compact mode with field for card holder |
|
https://cc.secupay.com?view=compact&owner=false |
compact mode without field for card holder |
You cannot omit the card holder in the traditional view.
After this we register three important handlers:
to initialise the CC iframe with a few data after it is loaded (lines 27-59);
to respond on CC iframe messages (lines 61-89);
to respond on our button and forward it to the CC iframe (lines 91-99).
The handler to initialise the iframe is called at the beginning. We pre-fill the name of the card holder with "Max Mustermann", change the theme, and set the language to English (en). All three are optional.
|
Action |
Parameter |
Value |
|
set-owner |
owner |
String with owner name, for instance "Max Mustermann" |
|
set-theme |
theme |
|
|
set-lang |
lang |
|
You can also post these values later, but with the exception of set-lang this doesn't make much sense .
The handler to respond on iframe messages (lines 61-89) first checks for the correct origin. After this it responds to the two types of messages that can occur:
cc-iframe-height asks the main window to change the iframe height. It is up to you to do this more softly.
prepared-cc-data asks the main window to process the iframe data. You would check whether everything is OK. If so, you would use the data to create the Payment Container.
Here is an example JSON structure of the returned data. It is taken from e.data.data at line 82 of our above example, and it shows a VISA card for Max Mustermann, valid thru 12/2025:
{ "owner": { "value": "Max Mustermann", "isValid": true, "errorMessage": "" }, "cardNumber": { "value": "4111XXXXXXXX1111", "isValid": true, "company": "VISA", "errorMessage": "" }, "expDate": { "value": "12/25", "isValid": true, "errorMessage": "" }, "encryptedData": { // ... }, "allFieldsAreValid": true}You will never receive the plain card number nor the CVC code.
Usually you would only check whether allFieldsAreValid is true (last line of the JSON above). If so, you can go on with the payment authorisation. If not you would wait for the user to correct his data, and press the submit button again.
Here an example with validation errors:
{ "owner": { "value": "Max Mustermann", "isValid": true, "errorMessage": "" }, "cardNumber": { "value": "4111XXXXXXXX1112", "isValid": false, "company": "", "errorMessage": "This is not a valid card number" }, "expDate": { "value": "12/25", "isValid": true, "errorMessage": "" }, "encryptedData": { // ... }, "allFieldsAreValid": false}Here a typical series of events:
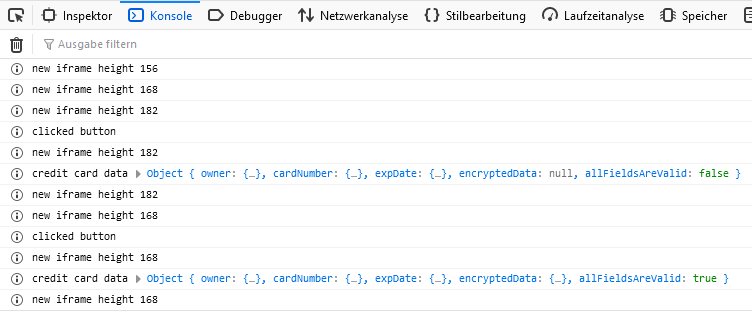
The best way to understand how this works, is to take the HTML example above, run it in your browser, and observe the JavaScript console.
Authorise the Payment
In order to authorise the Smart Transaction for credit card payment, you need to call POST Smart/Transactions/STX_xxx/prepare/creditcard:
POST /api/v2/Smart/Transactions/STX_33PXAW2YN2NJTPM5KPGMK7QF5PBVA2/prepare/creditcard HTTP/1.1Host: connect-testing.secupay-ag.deAuthorization: Bearer qb56tjj1bcvo9n2nj4u38k84loContent-Type: application/jsonAccept: application/json{ "container": { "type": "credit_card", "private": { "owner": "Max Mustermann", "pan": "411111XXXXXX1111", "expiration_date": "2026-01-01T00:00:00+00:00", "issuer": "VISA", // ... } }, "callback_urls": { "success_url": "https://www.example.org/3DS-success", "failure_url": "https://www.example.org/3DS-failure" }}This is the exact parameter mapping:
|
Returned from Frontend |
|
Details for Credit Card Container |
|
/encryptedData/masked/card_owner |
→ |
private.owner |
|
/encryptedData/masked/card_number |
→ |
private.pan |
|
/yearExp/value, /monthExp/value |
→ |
private.expiration_date |
|
/cardNumber/company |
→ |
private.issuer |
|
/encryptedData/crypted_container |
→ |
private.transact_container |
|
/encryptedData/crypted_skey |
→ |
private.transact_skey_pubkey |
|
/encryptedData/key_filename |
→ |
private.transact_skey_keyname |
|
/encryptedData/container_hash |
→ |
private.transact_hash |
The two callback URLs are needed to return the customer to your checkout after succeeded or failed 3-D Secure check. Whether a 3-D Secure check is needed, can be recognised by the API response.
If you have any questions about these details, please ask our friendly help desk.
In the best case, the Smart Transaction is authorised immediately:
HTTP/1.1 200 OKContent-Type: application/json...{ "object": "smart.transactions", "id": "STX_33PXAW2YN2NJTPM5KPGMK7QF5PBVA2", // ... "customer": { "object": "payment.customers", "id": "PCU_WZ3HENRNE2NSQMSQHRD58CPH7GHCA2", "contact": { "forename": "Mike", "surname": "Mustermann", "name": "Mike Mustermann", "address": { "street": "Musterstr.", "street_number": "42", "additional_address_data": "App. 97", "postal_code": "09999", "city": "Dorianburgh", "country": "DE" }, "email": "Eunice.Spencer89@example.net", "mobile": "+491775555555", "phone": "+495555555555", "dob": "1965-12-31T00:00:00+01:00" } }, "container": { "object": "payment.containers", "id": "PCT_SF9XGHPVC2NSQX03V86EREAMMET7AZ" }, // ... // ... "transactions": [{ "object": "payment.transactions", "id": "PCI_4YN04HZ4Z705GMRSJ5EW4J4X0ZDPNW" }], "created": "2020-10-29T14:13:41+01:00", "updated": "2020-10-29T14:13:50+01:00", "status": "approved", // ... "payment_method": "creditcard", "trans_id": "30093721", // ...}This means, no 3-D Secure check is needed.
Status approved means the payment is authorised and you should be able to capture it. Status failed means you must repeat the payment process. You must also repeat the payment process when you update the Smart Transaction. It is then set back to created.
If the option auto_capture is true, it would already capture the Smart Transaction. Status ok, received or collection means you can deliver. Status pending means you have to wait for one of these statusses. Status failed means the payment failed, and you must repeat the payment process.
In case a 3-D Secure check is needed, the status stays unchanged (created or with loyalty probably processing), and an iframe URL is added to the Smart Transaction:
HTTP/1.1 200 OKContent-Type: application/json...{ "object": "smart.transactions", "id": "STX_33PXAW2YN2NJTPM5KPGMK7QF5PBVA2", // ... "customer": { "object": "payment.customers", "id": "PCU_WZ3HENRNE2NSQMSQHRD58CPH7GHCA2", "contact": { "forename": "Mike", "surname": "Mustermann", "name": "Mike Mustermann", "address": { "street": "Musterstr.", "street_number": "42", "additional_address_data": "App. 97", "postal_code": "09999", "city": "Dorianburgh", "country": "DE" }, "email": "Eunice.Spencer89@example.net", "mobile": "+491775555555", "phone": "+495555555555", "dob": "1965-12-31T00:00:00+01:00" } }, "container": { "object": "payment.containers", "id": "PCT_SF9XGHPVC2NSQX03V86EREAMMET7AZ" }, "transactions": [{ "object": "payment.transactions", "id": "PCI_4YN04HZ4Z705GMRSJ5EW4J4X0ZDPNW" }], "created": "2020-10-29T15:53:11+01:00", "updated": "2020-10-29T15:53:25+01:00", "status": "created", // ... "payment_method": "creditcard", "trans_id": "30093750", "iframe_url": "https://securepay.epayworldwide.com/securepay/pay.php?TID=93999999&IDENT=93999999_2910...", // ...}In this case you have to offer the customer the iframe_url. He will then go through the 3-D Secure process.
Despite its name, you should not open the iframe_url within an Iframe ( <iframe> ):
3-D Secure checks can leave the Iframe and switch to full-screen. In this case, the success (success_url) or failure URL (failure_url) of the shop is not opened inside the Iframe, but in the uppermost browser window (DOM window.top).
Some popular browsers have very strict same-origin restrictions for third party content, so that Cookie technology will not work inside Iframes. Most external authorisation flows cannot be completed.
In case you would also like to offer Sofort, please note that such payments are not allowed in Iframes at all.
After the 3-D Secure process the customer is either directed back to the success_url or failure_url you have passed when calling /prepare. When the success_url is called, the Smart Transaction can be expected to have status approved now. You can proceed to start the Smart Transaction and capture the payment. If auto_capture is set, the payment is already captured, and the Smart Transaction has either status ok, received or collection.
When the failure_url is called, you need to repeat the payment process.
You can ask our help desk to change the contract settings for demo transactions, so that you can test either with 3-D Secure or without.
Capture the Payment
The way to capture an authorised payment is the same for all payment methods. If you have already studied this for invoice or direct debit payment, you will not find any new details.
In order to start the authorized Smart Transaction, you only need to call POST Smart/Transactions/STX_xxx/start.
POST /api/v2/Smart/Transactions/STX_33PXAW2YN2NJTPM5KPGMK7QF5PBVA2/start HTTP/1.1Host: connect-testing.secupay-ag.deAuthorization: Bearer qb56tjj1bcvo9n2nj4u38k84loAccept: application/jsonIf everything is fine, the API responds with 200 OK:
HTTP/1.1 200 OKContent-Type: application/json { "object": "smart.transactions", "id": "STX_33PXAW2YN2NJTPM5KPGMK7QF5PBVA2", // ... "transactions": [ { "object": "payment.transactions", "id": "PCI_FDBREW9ZS7P6FTN4ZY2ATC6NK0QWO7" } ], "created": "2020-03-27T10:55:23+01:00", "updated": "2020-03-27T10:56:41+01:00", "status": "ok", // ...}Status ok, received or collection means you can deliver. Status pending means you have to wait for one of these statusses. Status failed means the payment failed, and you must repeat the payment process.
In case of invoice payment you need to mark the actual delivery. This is to know the payment has become due, and to calculate the due date.
See Also
Further information:
Other payment methods: